Scheduled fun - a step by step...

>> Friday, November 11, 2011

I'm sharing a step by step for one of my layouts today - I always love seeing how other scrappers go about putting their pages together, hopefully you guys do too! This is my layout, using a mix of the Memorandum and Head over Heels lines.


My youngest daughter had a playdate recently and she and one of the other girls spent an hour on the phone planning what they would do, down to the minute! They stuck to the schedule too - it was super cute and I couldn't resist turning it into a layout.

Instructions.

First up, cut out the two roses from the bottom of the Swoon patterned paper, leaving the title strip below. Layer this on top of some muslin and black card stock and machine stitch it all together messily.


Next cut down a piece of white card stock to 11 1/2" square, ink heavily around the edges and mat it onto a piece of black cardstock. Do the same for two pieces of patterned paper, one 8 1/2 x 9" and the other 6 1/2 x 4 1/2" and doodle a messy line around the edge of each with a black journalling pen. Cut some strips of Kraft cardstock and use the same border punch - and please ignore the orange semi-circles, they ended up in the bin somewhere around step 4 lol...


Once you're happy everything is in the right spot, mark the placement of each element with soft pencil marks then separate the papers and splatter them randomly with black ink.


Put the papers back together using the pencil marks as a guide and stick them down. Use foam tape between each piece making sure to leave enough room around the edges to slot things under later.


Now to build the first cluster. Cut out one of the smaller roses from Swoon, choose a couple of stickers and mat them onto black and use a die cut machine or punch to make leaves out of patterned paper and Kraft. Also grab a scrap of muslin, a safety pin, some string and another smaller strip of scalloped black cardstock. Build the cluster by placing the larger items at the bottom and working your way up. Add some foam tape between each layer and trim any unseen parts of the stickers to use in your other clusters. Thread the string through the safety pin, drape it over the cluster and add a few drops of clear drying glue to keep it in place.


Once you're happy with the first cluster it is just a case of using smaller pieces of the same elements to create the second and third.


Try and mix things up a bit by using the elements in different ways, such as using the string to tie the rose and leaves together rather than threading it through the safety pin but try not to add any new pieces.


All that's left now is to add the title, journalling and fill out the background with some small touches. Use a black pen to lightly trace over some of the gridlines on the Payday paper, punch some small butterflies and glue some tiny scraps of muslin randomly over the page.


And we're all done!


If you have a go at a layout based on this step by step, please do load it to our Facebook page, I'd love to have a look!


Lily Bee Supplies

Patterned Paper:
Memorandum - Payday
Head over Heels - Swoon
Head 0ver Heels - Dreamy

6x6 Tablet
Head over Heels - Crush
Head over Heels - Courting

Mixed Cardstock Stickers
Head over Heels

Other
Cardstock, punches, muslin, string, safety pin, ink, lettering


Read more...

Thanksgiving Placeholders

>> Thursday, November 10, 2011

It's time to get a little crafty with Thanksgiving approaching. Since we won't be traveling for the holiday this year, I am looking forward to spending lots of time in the kitchen cookin' up a meal for the family. I usually don't decorate the table with any major Thanksgiving decor, but this year I plan on spicing it up, just a little.


I made these super simple paper acorn place holders and decorated each of them with fall die-cut embellishments & chipboard accents. I used my trusty Silhouette die-cut machine to cut out the large acorn and backed the tops of the acorns with extra cardstock for sturdiness. The small leaves on each acorn was cut out using the Slice die-cut machine.


I love pennants, so these little acorns couldn't be without a few pennant banners addressed with each persons name - I love how the tiny ABC Stickers come into play with this project.


My daughter had the pleasure of picking out the colors and patterns for her
acorn. As you can see, she is quite proud of hers. What I loved most about this project was that it took me only an hour to complete, with the assistance of my little one, of course.

Cheers!

Lily Bee Supplies:
6x6 Tiny Tablet: Harvest Market

Pattern Paper
Harvest Market Squash
Harvest Market Hayride
Harvest Market Peach Crisp
Harvest Market Black Licorice
Harvest Market Pumpkin Seeds
Stationery Pear
Stationery Tangerine
Stationery Grape
Stationery Butter

ABC Stickers
Harvest Market

Chipboard Stickers
Domestic Bliss
Christmas Town

Other:
Silhouette die-cut machine, Slice die-cut machine, Kraft Cardstock, String & Pearls

Read more...

Sketch #3...a card...

>> Wednesday, November 9, 2011


I knew as soon as I saw Linda's sketch that I wanted to turn it into a card. The design is perfect for a card. So, I'm breaking the rules and not creating a layout with the sketch...and I'm giving you permission to do the same...not that you needed my permission or anything! Isn't it just perfect for a card.


Lily Bee Supplies:
Patterned Papers: Memorandum-Office Blue
Mini Pads: Memorandum
ABC Stickers: Memorandum
other: sewing machine, punches 

Don't forget that this is her fabulous sketch that you have until November 15th to use!


And these are the not-so-fine print for the challenge:
1) Use at least two Lily Bee products (any two).
2) Post your layout on our Facebook page (please include the title Lily Bee Sketch Challenge 3) -OR- include a link to your project in the comments of this post. Please do one or the other, not both.
3) The deadline is Tuesday November 15th, 9PM EDT.  We'll randomly pick one winner to receive some delicious Lily Bee products!


Read more...

Lots of Layers!

>> Tuesday, November 8, 2011

I love layering elements on my pages for the depth and detail it lends. From cardstock to patterned paper to stickers to embellishments, a layout doesn't feel finished to me unless I've got lots of layers!

One of my favorite qualities about the Lily Bee paper designs is how easy it is to layer them together in a design.  On this page, I used almost all of the papers in the Memorandum line, layered together to make a dimensional grid on the lower half of the layout:

Grand Lake by Lisa Dickinson
Lily Bee Supplies:
Memorandum Patterned Papers:
Lemon, Boardroom, 9 to 5, Grapefruit, Time Clock,  Office Blue, Whiteboard, Cubicle, Payday


My base layer of Lemon patterned paper is topped with punched scalloped circles and then layered with punched butterflies, buttons, stitching, labels, or journal strips.  I love the texture and detail the little circles add to the page, without competing with my focal photo.

So try layering some of the Lily Bee papers on your next page - we'd love to see what you create!


Read more...

Focus On: Stamps

>> Monday, November 7, 2011

Good Morning and Happy Monday! Today, we are taking a peek at our stamps, which are made here in the USA with highest quality photopolymer. They are deeply etched and you'll get crisp impressions. We asked our designers to come up with projects to share with you, featuring our stamps.

These first two cards are by Ronda Palazzari. Ronda said, "that deer was so beautiful I just wanted him to be the focal point of the card. I saw him bursting in red on old text paper. To keep him the center of attention, I used cream papers as the background. A little embellishment on the side of the book plate keeping with the woodsy feel.  Stitches complete this elegant card."

Supplies:
Jingle Mistletoe Paper
Jingle Tinsel Paper
Jingle Stamps (Deer & Bracket)
Other: Twine, Book Plate, Trinket Pins, Vintage Music & Book Paper
 
"Those trees are so fabulous in design I decided to keep the card simple. I first glued my strip of red striped paper to the bottom third of the white cardstock. I then stamped each tree in a different ink using the line of the patterned paper as a guideline. I stamped merry Christmas to the center and added some baker’s twine. I placed the card on the beautiful green mistletoe paper to finish the card."
Supplies:
Jingle Mistletoe Paper
Jingle Eggnog Paper
Jingle Stamps (The three Christmas Trees & Merry Christmas Stamp)
Other: White Cardstock, Twine, stapler
 
Gotta love these beautiful tags by Kim Arnold. More personal than store bought, and easy to make! Here's what she had to say about them: "I love how the stamps can be used to easily convert a boring old shipping tag into a super cute Christmas gift tag. By stamping each of the snowflakes separately on the background, each tag is individual, which I think is a nice touch. The label is so easy to make by using a frame stamp and saying stamp from the set. Super easy, so you can easily make lots for this Christmas!"
Lily Bee supplies:
Jingle 6x6 Tiny Tablet
Jingle ABC Stickers
Jingle clear stamps
 
Who doesn't love shrinky dinks? Georgia Keays cleverly adds it to her layout! And then kindly shares the few easy steps to make your own!
  1.  stamped onto shrink plastic and shrunk to make buttons
  2. stamped with versamark and then clear embossed on the envelope to give it a bit of texture
  3. stamped with versamark on a piece of cardstock and embossed with red
  4. because I thought I probably should I stamped part of the Memorandum numbers stamp onto some cardstock.
Memorandum
9 to 5-MEP128
Payday-MEP131
Memorandum ABC Stickers-MES135
Memorandum Clear Stamps-MEC136
Memorandum Index Journaling Cards-MEJ138
Memorandum Mixed Cardstock Stickers-MES134


Katja used a stamp to create a a background grid, and then colored it with some markers to make a fab flower for her project. Such a great addition that you can make too! "For this project I've decided to use the Memorandum grid stamps. They are so versatile and can be used in so many ways. I've started by stamping the grid on the 'Whiteboard' paper and punching circles out of the stamped image. I've used Copic markers to color some of the little squares. I then folded the circles in half. The middle of the flower is a chipboard circle that was also stamped with the grid stamp but was then embossed with clear embossing powder. Rubbing some ink over the chipboard leaves the embossed image white. I've layered the half circles under the chipboard circle to make my flower. It just adds a nice handmade touch to the project!"

Supplies:
Patterned Paper:
Memorandum - Whiteboard ; Head over Heels - 6x6 Tiny Tablet
ABC Stickers: Head over Heels
Mixed Cardstock Stickers: Head over Heels
Stamps: Memorandum
Index Journaling Cards: Memorandum
Other: Copic Markers, Ribbon, Tattered Angels Glimmer Glaze

Thank you for making the time to visit us today. We hope you've enjoyed these projects. See you tomorrow with more inspiration here on our blog!

Read more...

Friday Finds

>> Friday, November 4, 2011

Happy Friday! Have we mentioned how much we love looking at your Lily Bee creations on our Facebook page? WE LOVE IT! Thank you for supporting Lily Bee, hanging out with us, making our day.

Here are some of the awesome layouts we've seen in our Facebook page lately.


Y'all have a fabulous weekend.

Read more...

Getting Ready for November

>> Thursday, November 3, 2011

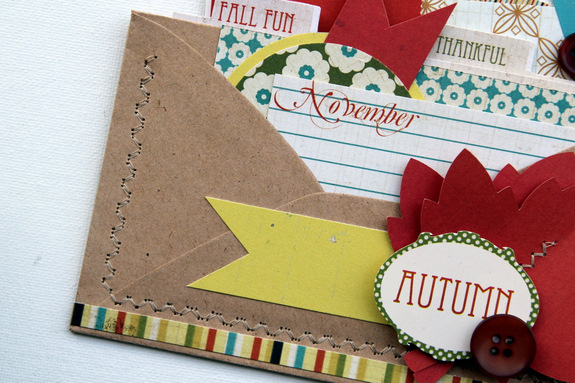
I still can't get over how quickly days go by and wow, November is already here. Oh my, the next thing I know it'll probably be Dec 24th (as then I would be expecting something from dearest hubby..LOL). With time flying by so fast lately, I can't seem to remember and keep track of all the amazing things (and not so amazing things, such as the flood situation back home in Bangkok), so I created this little mini envelope booklet/holder using the harvest market collection - to store all the little details of the month.
Having been inspired lately by all the amazing envelope creations everywhere, I decided to create my own version - using these small kraft envelopes that I found at a discount store (25 for less than $1 and they're kraft!!! - need I say more?). And also they are the perfect size for the index journaling cards too...

To create the booklet of envelopes, all I did was lined them up (with the flap tucked inside) and sown the bottom 3 sides together (no adhesive used).


Next came out my silhouette machine and using the pumkin pattern paper, I cut out those two maple tree leaves to embellish the front; along with a sticker from the harvest market collection mix cardstock sticker sheet.


Then I randomly tucked in the various index journaling cards and also created few of my own journaling tags. The idea is that through out the month, I would be adding the journaling details of what had been happening and also any keepsakes collected along the way (ie. those concert tickets that we're suppose to see next sunday or the all the plane tickets back and forth between singapore and bangkok... and the story goes on and on).


Lily Bee Products used:

Pattern Paper: Harvest Market Black Licorice HMP164; Pattern Paper: Harvest Market Turtleneck HMP165; Pattern Paper: Harvest Market Hayride HMP166; Pattern Paper: Harvest Market Squash HMP167; Pattern Paper: Harvest Market Pumpkin Seeds HMP168; Pattern Paper: Harvest Market Pumpkin HMP182; Mixed Cardstock Stickers: Harvest Market HMS170; Index Journaling Cards: Harvest Market HMJ174.


Thanks everyone for stopping by and don't forget to link us up to your creations; as we would love to see what fall projects you've been creating with Lily Bee Goodies and also any tips you want to share on how you keep track of all your wonderful memories. :)


Photobucket

Read more...